LDAP Server Configuration
If you will be adding any users and/or groups using LDAP (Lightweight Directory Access Protocol), you will first need to add an LDAP server definition. To add an LDAP server definition, click on LDAP/Servers in the Navigation pane then click on Add Server.
This will open up the dialog box below where you will configure the server and then assign values used for the LDAP attributes required by MAPS when adding an LDAP user and/or group.
Note: You may need to consult with your LDAP Administrator to configure the LDAP Server.
Adding LDAP Server - General
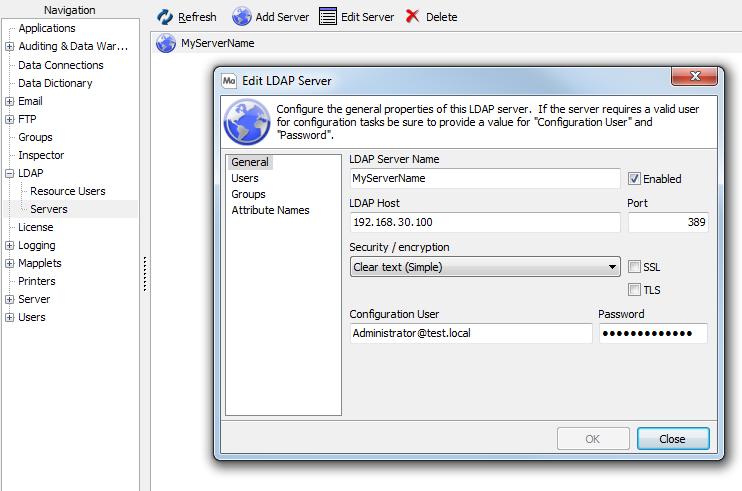
LDAP Server Name - This acts as the alias for the server being defined. In this example, the Server Name is called Evisions.
Enabled - By default, an LDAP server is enabled when you add it to MAPS. If you are still in the process of configuring the server, or for some reason do not want users from this LDAP server to be able to connect, you can uncheck the box to prevent users from connecting. When an LDAP server is disabled, no users who connect via this LDAP server will be able to log in to MAPS or the MAPS applications. Disabled LDAP servers have a gray icon.
LDAP Host and Port - Enter the IP or network name for the LDAP server. The default port for LDAP is 389. Change this value if your site uses a different port for accessing your LDAP Server. If MAPS is installed in a hosted cloud environment, ensure that your LDAP Host can be accessed from within that environment.
Security / encryption - Choose the type of encryption to be used to communicate between the LDAP server and the MAPS server. There are two options – ‘Clear Text’ or ‘Negotiate Win32 security’. Selecting SSL will cause communication to be encrypted by SSL from the start of the connection on the dedicated LDAPS port (by default 636). Selecting TLS will start communication normally on the standard LDAP port (by default 389), and then security is switched to use SSL prior to logging in.
Configuration User - Enter the user id and password of a user who has access to the LDAP configuration. The password will be encrypted.
Adding LDAP Server - Users
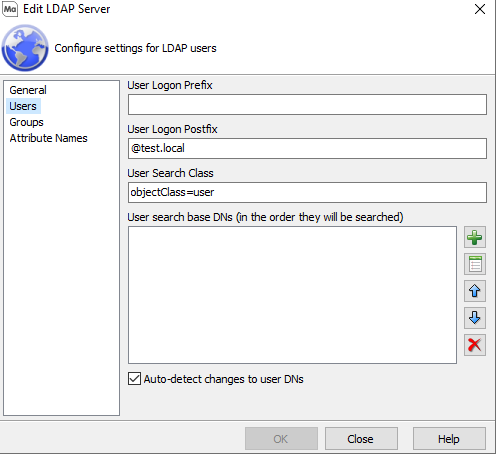
User Logon Prefix or User Logon Postfix - When a user logs onto LDAP they typically use what is called their User Logon name. If using the Active Directory Service, there could be a required Prefix (if pre-Windows 2000) or a postfix (typically the domain) value. If using a Prefix, follow the value with a back-slash (\). If using a postfix, precede the value with the “at” symbol (@).
User Search Class - The object class that identifies your users. This field defaults to "objectClass=User", and can be edited as needed for LDAP servers that use a different object class.
User Search Base DN - In this field the Node or Object where user definitions are stored is entered. This speeds up the process when searching for valid user accounts. The Add, Edit, and Delete buttons on the right are used to configure one or more user search base DNs, or the list order can be arranged using the arrow buttons. Select Add to bring up the following dialog box:

Note that the Base Path (Domain Name is filled in).
Click the Search button to display the list the available Nodes (shown below).
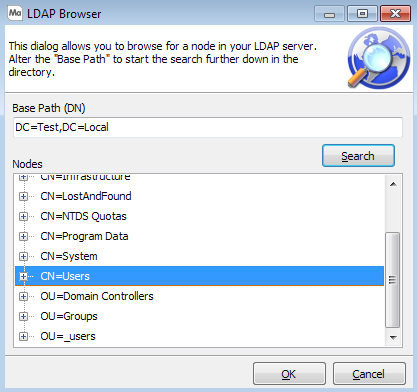
Finally, select the Node which holds the user definitions and click OK to have that value populate the User search base DN.
Auto-detect changes to user DNs - If an LDAP user's DN changes due to changes on the LDAP server, checking this box allows MAPS to search the LDAP server to locate the user if the DN lookup fails. If this box is not checked, you will need to manually update MAPS if the user's DN changes. This option only applies to LDAP users who have been added to MAPS individually. Additionally, it currently only works when the user's DN is within the specified user search base DN.
Adding LDAP Server - Groups
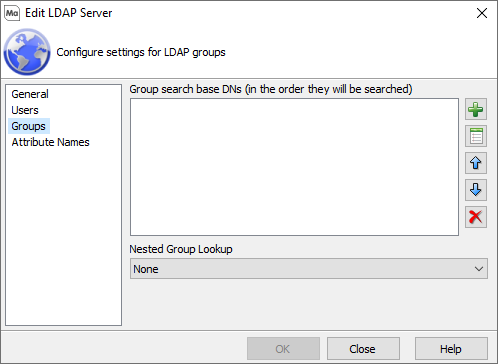
Group Search Base DN - In a similar manner, you can specify a node or object that contains the group definitions. Click the ellipsis to launch the dialog and browse for the location where your groups are located.
Nested Group Lookup - If your LDAP server uses nested groups, change this from None to Implemented by LDAP Server to allow MAPS to recognize your server's settings. This option only works when using Active Directory.
Note: If you use nested LDAP groups, we strongly recommend configuring the group search base DN. Leaving this field blank may result in decreased performance when logging in or performing other operations that require user authentication.
Adding LDAP Server - Attribute Names
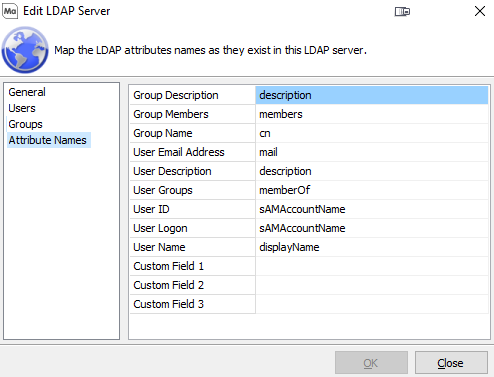
To assist in obtaining the values, select a property, then click on the ellipsis next to the field. The following dialog box will be displayed.
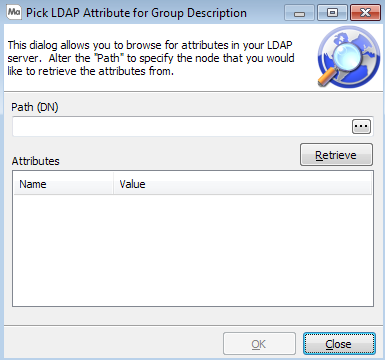
If you know the path or domain name, enter the value. Otherwise, click on the ellipsis to bring up the LDAP browser that has been filled in with the complete domain path.
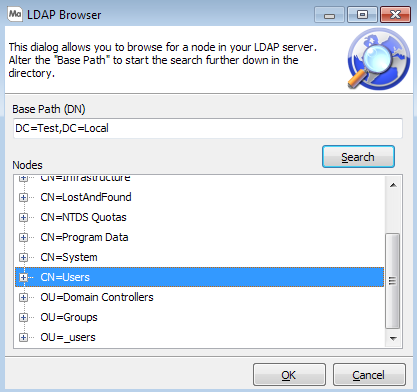
Click the Search button to return a list of nodes and then select the node containing the object you are searching for. Below, the Node of “Users” was selected.
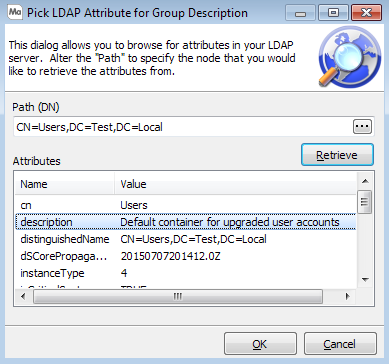
Click OK to return to the “Pick LDAP Attribute for Group Description” dialog box.
Click on Retrieve to obtain a list of the attributes used for “Users”, then select the attribute value for the attribute being populated.
Click the OK button to complete the addition of attributes.
The LDAP Server configuration is complete. You can now add LDAP Groups and Users.